Science Project Ideas
Science experiments are an important part of one’s school life. We all remember navigating science books to get the idea of that one eureka experiment that wins you the science fair competition, makes you a hero in front of your classmates and teachers, and helps you land a genius reputation for a year. Regardless of your motives, researching and making a science model helps you build intelligence and understanding of important concepts by practical usage in real life.
It is important to put your theoretical knowledge to use by experimentation. A student gains critical thinking skills and uses creative skills to represent similar models in unique ways. One can get a better hold of subjects by using one’s sparkling interests in various fields of physics, chemistry, and biology. Today, let’s give you some ideas for 10th class science experiments to practice and learn.
(Do You Know: How to Write a Formal Letter?.)
Top 10 Science Experiment Models For Class 10
Experiment 1: Electromagnet
We will demonstrate the principle of electromagnetic induction by creating a simple electromagnet.
 

Materials:
- Iron nail
- Insulated copper wire
- Battery
- Paper clips
- Switch
Steps:
1. We will start by winding the coil. Start to wrap the insulated copper wire around the iron nail in a tight manner.
2. Attach one end of the wire to the positive terminal of the battery and one end to the switch. Now let’s connect the other terminal of the battery of the switch to the negative terminal of the battery.
3. We will now turn on the switch and bring the paper clips near the nail. Observe what happens. When you turn on the switch and bring the electromagnet (the nail wrapped in wire) near the paper clips, the paper clips will be attracted to the electromagnet.
(Suggested Read: How to write a leave application to the principal?)
4. Try experimenting with different factors.You can start by varying the number of turns in the coil, the type of metal used for the nail, and the strength of the battery to see how these factors affect the strength of the electromagnet.
Experiment 2: Chromatography

Materials:
- Filter paper
- Markers
- Beaker
- Water
- Pencil
(You May Also Like: Check out the list of proper nouns from A to Z)
Steps:
- Using a pencil draw a line about 1 inch from the bottom of the filter paper.
- Start applying dots by putting dots of different colored markers on the line spaced evenly apart.
- Now let’s set up the chromatography by placing the filter paper in the beaker, ensuring the bottom edge is submerged in water.
- Start by observing the chromatography now, watch as the water rises on the filter paper, and separate the colors of the markers.
- At last, we will analyze the results by comparing the colors and their positions on the filter paper to understand how the components of the markers are separated.
Experiment 3: Egg Drop Experiment
We will design and build a protective container that can prevent an egg from breaking when dropped from a height.

Materials:
- Egg
- Various materials for construction (e.g., cardboard, plastic, straws, tape, glue, foam, balloons)
Steps:
- Firstly let’s brainstorm ideas on how to protect the egg from breaking. Consider factors such as impact absorption, cushioning, and weight distribution.
- Now let’s create a detailed plan for your protective container by sketching out the design.
- For building, we will construct the container using the materials ensuring it’s sturdy and can withstand the drop.
- The main step would be testing out our container. First, let’s drop the container with the egg inside from a low height. Gradually increase the height until you reach the desired test height.
- As a science student it is very important to evaluate. Analyze the results of your test. Did the egg break? If so, what went wrong? If not, what design features contributed to the egg’s safety?
- Iterate: Based on your evaluation, make improvements to your design and repeat the test.
(Know More: Top list of courses to pursue after 10th standard)
Experiment 4: Seed Germination
We will investigate the factors that affect seed germination.

Materials:
- Seeds (e.g., beans, lentils, peas)
- Petri dishes
- Paper towels
- Water
- Light source
- Dark place
Steps:
- Let’s start by preparing the Petri dishes. To do that, first moisturize paper towels with water and place them in the Petri dishes.
- We will place a few seeds on the moist paper towels, ensuring they are evenly spaced.
- Our experiment will revolve around creating different conditions with multiple petri dishes. Different conditions:
- Light vs. dark: Place some dishes in a light area and others in a dark place.
- Temperature: Place some dishes in a warm area and others in a cool area.
- Moisture: Vary the amount of water added to the paper towels.
- Observe the seeds daily and record your observations. Note when the seeds begin to germinate, how quickly they grow, and any differences in appearance.
- Now compare the germination rates and growth patterns under different conditions. Identify which factors seem to have the greatest impact on seed germination.
Note: Want to achieve top marks in your class? Here are some essential study tips from top students that can help you excel!
Experiment 5: Electrolysis of Water
We will demonstrate the decomposition of water into hydrogen and oxygen gasses using electrolysis.

Materials:
- Two electrodes (e.g., graphite rods or copper wires)
- Battery
- Test tubes
- Beaker
- Distilled water
- Sodium bicarbonate (optional)
Steps:
- Fill a beaker with distilled water. For better conductivity, we will add a small amount of sodium bicarbonate. Now we have our solution ready for the experiment.
- We will now connect the positive terminal of the battery to one electrode and the negative terminal to the other.
- It is important to submerge the electrodes in the solution. For this, we will carefully place the electrodes into the solution, ensuring they are completely submerged and not touching each other.
(Suggested Read: How to solve BODMAS questions for class 6?)
- Invert two test tubes over each electrode. The oxygen gas will be collected at the positive electrode, while the hydrogen gas will be collected at the negative electrode. The collection of gases would be done with this step.
- Watch as the gases are produced and fill the test tubes.
- We can now test the gases produced using a lit splint. Hydrogen gas will ignite with a pop sound, while oxygen gas will cause a flame to burn more brightly.
Experiment 6: Solar Water Purifier
We will design and build a simple solar water purifier.

Materials:
- Clear plastic bottle
- Dark-colored fabric or paper
- Small stones
- Sand
- Activated charcoal
- Duct tape
Note: NEET is the common entrance exam for medical students after 12th, but can you pursue a BDS degree without attempting NEET? Find out here!
Steps:
- Start by cutting the bottom off a clear plastic bottle.
- The most interesting part of this experiment is creating the filtration layers. Place a layer of small stones at the bottom of the bottle, followed by a layer of sand, and then a layer of activated charcoal.
- Now, cover the top of the bottle with dark-colored fabric or paper.
- Pour dirty water into the bottle and wait for it to filter.
- Make sure you place the bottle in direct sunlight.
How it works:
- The dark-colored material absorbs sunlight, heating the water inside the bottle. Later, this heat causes the water to evaporate, leaving behind impurities.
- The evaporated water now condenses on the cool surface of the bottle and collects at the bottom.
- As the water passes through the layers of stones, sand, and activated charcoal, impurities are filtered out and we get filtered water.
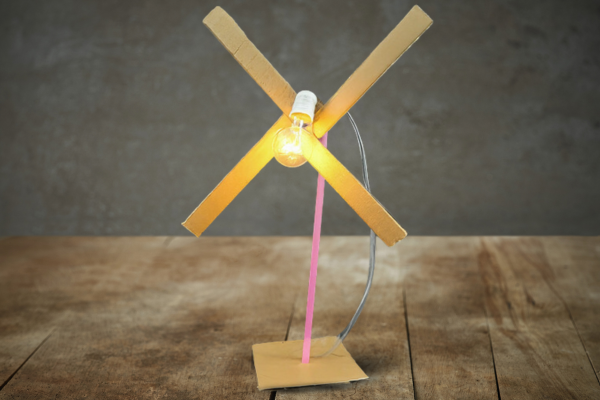
Experiment 7: Wind Turbine Model
We will build a simple wind turbine model and understand the principles of wind energy generation.
Materials:
- Cardboard
- Plastic straws
- Paper clips
- Magnet
- Small motor
- Battery
- Wires
- Scissors
- Glue
- Ruler
Read More: If you are a creative individual, pursuing a creative writing course could be a fantastic opportunity for you!
Steps:
- We will start by cutting the cardboard into long, narrow strips. Roll them into tubes and secure them with glue. These will be the blades of our turbine.
- We will now assemble the rotor by attaching the blades to a central hub made of cardboard or plastic. We will ensure that the blades are evenly spaced and angled upwards.
- Attach a small motor to the central hub which will act as a generator.
- Connect the wires from the motor to a battery and a light bulb making a whole circuit.
- Now we shall mount the turbine by mounting the rotor on a stand or base.
- Place the turbine in a windy area and observe as the wind spins the blades. The motion of the blades will generate electricity, which will light up the bulb.
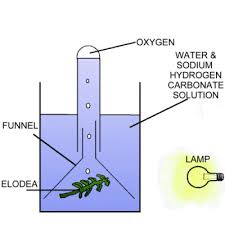
Experiment 7: Photosynthesis
We will demonstrate the process of photosynthesis using a simple experiment.
Materials:
- Elodea plant (or other aquatic plant)
- Test tube
- Beaker
- Sodium bicarbonate solution
- Bromothymol blue indicator
- Light source
(Read More: Understand the percentage Calculation for ICSE Class 10)
Steps:
- To prepare the solution add a few drops of bromothymol blue indicator to a beaker of water. This solution should turn yellow.
- Place a small piece of Elodea plant in a test tube filled with the yellow solution.
- Place the test tube in a beaker of water and expose it to a light source.
- After a few minutes, observe if the color of the solution in the test tube changes from yellow to blue. You will be able to see the color changes over time.
- The color change indicates the presence of oxygen, which is produced during photosynthesis. This will be the result of our experiment.
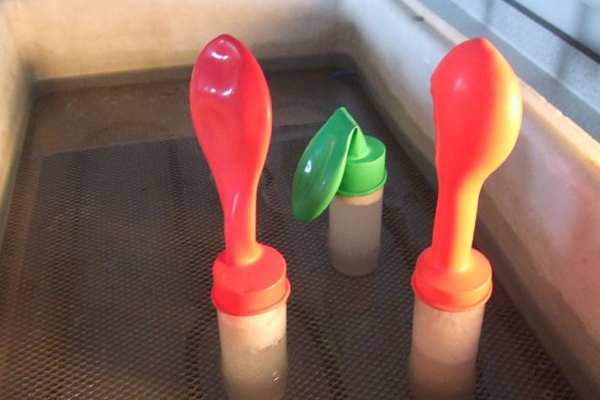
Experiment 8: Fermentation
We will observe the process of fermentation and its products.
Materials:
- Grapes
- Sugar
- Water
- Jar or bottle
- Balloon
- Rubber band
Steps:
- Start by crushing the grapes and adding sugar and water to a jar or bottle.
- Place a balloon over the jar’s opening and secure it with a rubber band. Place the jar in a warm, dark place and observe it over several days. You can add yeast to the mixture, which can speed up the fermentation process.
- Notice the changes in the mixture, such as the formation of bubbles and a fruity odor. The balloon may also inflate.
- Use a breathalyzer or alcohol test strips to test the liquid in the jar for the presence of alcohol.
(Read More: Explore a comprehensive list of top computer courses available after completing 10th or 12th grade.)
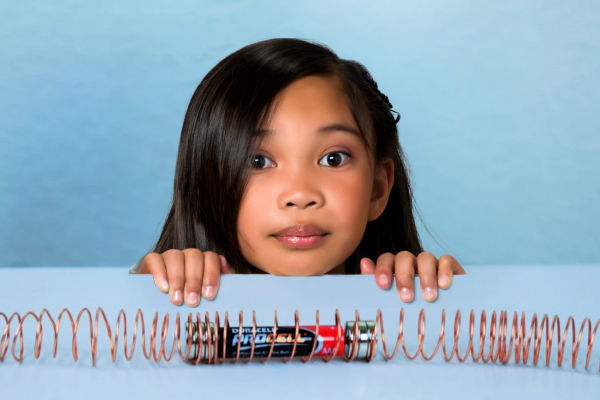
Experiment 9: Electromagnetic Train
We will build a simple electromagnetic train model.
Materials:
- Battery
- Neodymium magnets
- Insulated copper wire
- Cardboard
- Plastic straws
- Tape
- Scissors
Steps:
- First, let us create the track by cutting cardboard into long strips to form a track.
- To make the train, cut the cardboard into small squares for the train cars. Attach magnets to the bottom of each train car.
- Wrap insulated copper wire around the train cars to form coils.
- To connect the circuit, attach the ends of the coils to a battery.
- Place the train on the track and turn on the battery. The electromagnetic force between the magnets and the coils will propel the train to move forward.
(Suggested Read: How to become a Psychologist after 12th?)
Experiment 10: Homemade Battery
We will create a simple battery using common household materials.

Materials:
- Copper coin
- Zinc nail
- Lemon or potato
- Wires
- Voltmeter
Steps:
- We will start by cutting a lemon or potato in half, this will be used for making a battery.
- Now, we will push the copper coin and zinc nail into the cut side of the fruit or vegetable, making sure they don’t touch each other. These will act as our electrodes.
- Connect one wire to the copper coin and the other wire to the zinc nail.
- We will attach the voltmeter to the ends of the wires to measure the voltage produced.
- We can experiment with different materials like different fruits, vegetables, or metals to see how they affect the battery’s voltage.
(You may also like: What are the top Commerce courses after 12th?)
FAQs on Science Project Ideas for Class 10
Q: How do I choose a science project topic?
A: For choosing a science model idea, consider your interests, the availability of materials, the time you would require to complete the project, and the complexity of the project. It will be really helpful to consult with your teacher for guidance.
Q: How can I make my project stand out?
A: Choose a unique topic, conduct thorough research, and present your findings creatively and engagingly
Q: What are some popular science project topics for class 10?
A: Popular topics include physics, chemistry, biology, environmental science, and technology. Some specific examples are:
- Physics: Electromagnetism, optics, mechanics
- Chemistry: Acids and bases, chemical reactions, organic chemistry
- Biology: Genetics, microbiology, plant physiology
- Environmental Science: Climate change, pollution, renewable energy
- Technology: Robotics, artificial intelligence, renewable energy.
Conclusion
We know that Science experiments are a cornerstone of scientific exploration and understanding. The experimentation provides you with a platform to test theories, observe phenomena, and gain valuable insights into the world around us. This journey of discovery is beyond securing a good grade or winning a competition, it’s more about expanding your knowledge. I hope this article has helped you in your science model experiment and ideas. Remember, science is always a collaborative endeavor. Always seek guidance from your seniors and teachers to improve your creativity and understanding of concepts.
Source link
All Materials on this website/blog are only for Learning & Educational purposes. It is strictly recommended to buy the products from the original owner/publisher of these products. Our intention is not to infringe any copyright policy. If you are the copyright holder of any of the content uploaded on this site and don’t want it to be here. Instead of taking any other action, please contact us. Your complaint would be honored, and the highlighted content will be removed instantly.